


Background & Overview
The following documentation provides instructions for building an Oracle 11g RAC database with ASM residing on an Oracle Linux Server (Version 5.3, Kernel version 2.6.18). Use the command lsb_release -id to check the Oracle Linux OS version and uname -r to check the Kernel level.
Further reference documentation about Oracle RAC 11g and Oracle Linux is detailed in the Other References section below.
Assumptions & Pre-Requisites
This document expects and assumes the following:
- The instructions are carried out by a qualified DBA.
- All necessary client software, e.g. Telnet and X-Server is available.
- All references to SID should be replaced with correct database name as derived using a suitable database naming standard.
- All $variable references assume the .profile as described in the File Listings section has been implemented and run.
Useful Information
This section outlines useful information and changes to previous 10g documentation found on this site.
- A new deinstallation tool is used for deinstalling Oracle software and databases. See Deinstalling Oracle 11g section below.
- A new directory structure exists. See below.
- A new init.ora parameter called diag_dest has been set and maps to the diag directory in the new directory structure mentioned above.
- A listener.ora file has a new parameter called ADR_BASE_LISTENER. This maps to the base of the diag directory.
- There are a number of new maintenance jobs in 11g. These will be turned off as part of this step-by-step guide.
- The concept of a SCAN (Single Client Access Name) Listener has been introduced with RAC 11.2. The following article explains in detail the concept of a SCAN listener. 887522.1
- In order to install RAC, Oracle Grid Infrastructure will need to be installed. NOTE This should not be mistaken for Oracle Grid Control. Grid Infrastructure is the new software bundle for ASM and Clusterware. The following guide explains how to install Oracle Grid Infrastructure and any pre-requisite packages like ASMLIB.
- Read the Known Issues section below.
Step-By-Step Guide
1. Ensure the Oracle Linux version for both nodes is 5.3 or higher.
- lsb_release -id
2. Ensure the Oracle Linux Kernel version for both nodes is 2.6.18 or higher.
- uname -r
3. As a minimum ensure OEL has the following packages installed on both nodes.
binutils-2.17.50.0.6-6.el5 (x86_64)
compat-libstdc++-33-3.2.3-61 (x86_64) « both ARCH's are required. See next line
compat-libstdc++-33-3.2.3-61 (i386) « both ARCH's are required. See previous line
elfutils-libelf-0.125-3.el5 (x86_64)
glibc-2.5-24 (x86_64) « both ARCH's are required. See next line
glibc-2.5-24 (i686) « both ARCH's are required. See previous line
glibc-common-2.5-24 (x86_64)
ksh-20060214-1.7 (x86_64)
libaio-0.3.106-3.2 (x86_64) « both ARCH's are required. See next line
libaio-0.3.106-3.2 (i386) « both ARCH's are required. See previous line
libgcc-4.1.2-42.el5 (i386) « both ARCH's are required. See next line
libgcc-4.1.2-42.el5 (x86_64) « both ARCH's are required. See previous line
libstdc++-4.1.2-42.el5 (x86_64) « both ARCH's are required. See next line
libstdc++-4.1.2-42.el5 (i386) « both ARCH's are required. See previous line
make-3.81-3.el5 (x86_64)
4. Set the kernel parameters in /etc/sysctl.conf for both nodes as follows. NOTE If the current value for any parameter is higher than the value listed below, do not change the value of that parameter.
kernel.shmall = physical RAM size / pagesize For most systems, this will be the value 2097152. See Note 301830.1 for more information.
kernel.shmmax = 1/2 of physical RAM, but not greater than 4GB. i.e. 4GB minus 1 byte should be the maximum value on any system. This is to accommodate feature/bug detailed in Metalink note 567506.1.
kernel.shmmni = 4096
kernel.sem = 250 32000 100 128
fs.file-max = 512 x processes (for example 6815744 for 13312 processes)
fs.aio-max-nr = 1048576
net.ipv4.ip_local_port_range = 9000 65500
net.core.rmem_default = 262144
net.core.rmem_max = 4194304
net.core.wmem_default = 262144
net.core.wmem_max = 1048576
5. Ensure oracle account and dba group exists on both nodes.
6. Update the following file /etc/security/limits.conf on both nodes.
oracle soft nproc 2047
oracle hard nproc 16384
oracle soft nofile 1024
oracle hard nofile 65536
7. Ensure the following line in the /etc/pam.d/login file existis on both nodes.
session required pam_limits.so
8. Ensure oracle gets the correct ulimit values when logging on. This can be achieved by adding the following code to /etc/profile on both nodes.
if [ $USER = "oracle" ]; then
if [ $SHELL = "/bin/ksh" ]; then
ulimit -u 16384
ulimit -n 65536
else
ulimit -u 16384 -n 65536
fi
fi
9. The hostname command should return the fully qualified hostname.
10. Get a Unix administrator to set both machines to permissive mode.
- setenforce 0
11. Check the machines are in permissive mode using the following command.
- getenforce
NB This is required due to a bug/feature in Oracle.
12. Ensure /dev/shm is large enough on both nodes. It should be set to the size of the physical RAM minus 4GB. (or an appropriate amount reserved for the OS)
- umount tmpfs
- mount -t tmpfs shmfs -o size=20000m /dev/shm
- cd /dev/shm
- df -h .
13. Ensure DNS is configured correctly for the new SCAN listener and for the Private, Public and VIP addresses
rac1 IN A 192.168.2.201
rac2 IN A 192.168.2.202
rac1-priv IN A 192.168.0.201
rac2-priv IN A 192.168.0.202
rac1-vip IN A 192.168.2.211
rac2-vip IN A 192.168.2.212
rac-scan IN A 192.168.2.221
rac-scan IN A 192.168.2.222
rac-scan IN A 192.168.2.223NOTE The above information will be used throughout this guide.
14. Test that the SCAN listener resolves correctly. See Scan Listener Check section below.
15. Check the following Metalink article 880989.1 for any updates, including hardware, memory and virtual memory requirements.
16. Create the .profile - see File Listings section below.
17. Ensure the database file systems on both nodes have been created with the correct permissions and have been sized appropriately for the application. - see File Systems section below.
18. Log on to rac1
19. Install ASMLIB. At the time of writing this guide, the following Linux package had been identified by the Unix team, oracleasm-2.6.18-128.4.1.0.1.el5-2.0.5-1.el5.x86_64.rpm. This will install the following ASM 2.0 libraries
oracleasmlib-2.0 ~ The ASM libraries
oracleasm-support-2.0 ~ Utilities needed to administer ASMLib
oracleasm ~ A kernel module for the ASM library
20. Create a single partition on each device to be used by ASM.
- fdisk /dev/mapper/< alias >
- kpartx /dev/mapper/< alias >< partition >
21. Create the ASM disks
- oracleasm createdisk < disk label > /dev/mapper/< alias >< partition >
22. Check to confirm the disk are set-up correctly
- /usr/sbin/oracleasm listdisks
23. Download the latest oracle binaries from OTN. For example:
Enterprise Edition for Linux Operating System (64-bit)
linux.x64_11gR2_database_1of2.zip : 1,239,269,270 bytes; cksum - 3152418844
linux.x64_11gR2_database_2of2.zip : 1,111,416,131 bytes; cksum - 3669256139
linux.x64_11gR2_grid.zip : 1,052,897,657 bytes; cksum - 3369676398
24. Unzip the downloaded files using the following commands
- cd /u01/app/oracle/software/
- unzip <filename>
25. Before starting the RAC install it is possible to run runcluvfy.sh from the grid infrastructure software directory. This will check to make sure the prerequisites have been met. However, if SSH connectivity is configured using the installer then this check will fail as its dependant on SSH being configured manually. If SSH is configured manually run the following command runcluvfy.sh stage -pre crsinst -n rac1,rac2 -verbose to check that all prerequisites have been met.
26. Configure the DISPLAY variable.
27. Unset the ORACLE_HOME and TNS_ADMIN
- unset ORACLE_HOME
- unset TNS_ADMIN
28. Set the ORACLE_BASE
- export ORACLE_BASE=/u01/app/oracle
29. Ensure ORACLE_HOME/bin is NOT in the PATH
30. Start x-server.
31. Start the installer.
- cd /u01/app/oracle/software/grid
- ./runInstaller
32. Follow the instructions as demonstrated in the Example Grid Infrastructure Install section below.
Before continuing apply any oneoff patches or patch bundles or CPU patch bundles recommended by Oracle or the application vendor.
33. Start the installer.
- cd /u01/app/oracle/software/database
- ./runInstaller
34. Follow the instructions as demonstrated in the Example RAC Database Install section below.
Before continuing apply any oneoff patches or patch bundles or CPU patch bundles recommended by Oracle or the application vendor.
35. Check the status of the RAC install
- srvctl config database -d RAC
- srvctl status database -d RAC
- svrctl status scan_listener
36. Create additional ASM Disk Groups
- sqlplus '/ as sysasm'
- SQL> create diskgroup FRA EXTERNAL REDUNDANCY
- SQL> disk 'ORCL:asm disk label' ;
- SQL> exit;
37. Create the ADM aliases
- sqlplus '/ as sysasm'
- SQL> alter diskgroup DATA add directory '+DATA/<SID>';
- SQL> alter diskgroup FRA add directory '+FRA/< SID >';
- SQL> alter diskgroup FRA add directory '+FRA/< SID >/arch';
- SQL> exit;
38. Alter the disk group attributes to 11.2 compatibility.
- sqlplus '/ as sysasm'
- SQL> alter diskgroup DATA set attribute 'compatible.asm'='11.2';
- SQL> alter diskgroup DATA set attribute 'compatible.rdbms'='11.2';
- SQL> alter diskgroup FRA set attribute 'compatible.asm'='11.2';
- SQL> alter diskgroup FRA set attribute 'compatible.rdbms'='11.2';
- SQL> exit;
39. Create a password file for ASM
- cd $ORACLE_HOME/dbs
- rm orapw+ASM
- orapwd file=orapw+ASM password=password
40. Adjust the ASM parameters appropriate to your environment.
41. Adjust the DATABASE parameters appropriate to your environment.
42. Stop and Start the Database and ASM to pick up any parameter changes
srvctl stop database -d rac
srvctl stop asm -n rac1
srvctl stop asm -n rac1
srvctl start asm -n rac1
srvctl start asm -n rac1
srvctl start database -d rac
43. Configure /etc/oratab file and test using . oraenv command - see File Listings section below.
44. Disable the default 11g maintenance jobs.
- sqlplus /nolog
- SQL> connect sys as sysdba
- SQL> BEGIN
- SQL> dbms_auto_task_admin.disable(client_name => 'auto optimizer stats collection', operation => NULL,window_name => NULL);
- SQL> dbms_auto_task_admin.disable(client_name => 'auto space advisor', operation => NULL, window_name => NULL);
- SQL> dbms_auto_task_admin.disable(client_name => 'sql tuning advisor', operation => NULL, window_name => NULL);
- SQL> END;
- SQL> /
Security Compliance
The following steps should be performed once the database has been built to ensure that the environment conforms to Oracle's Best Practices and also ensures that it doesn't fall foul of Internal Audit.
1. Remove the GRANT EXECUTE TO PUBLIC privilege from potentially harmful packages.
- sqlplus '/ as sysdba'
- SQL> revoke execute on utl_file from public;
- SQL> revoke execute on dbms_random from public;
- SQL> revoke execute on utl_http from public;
- SQL> revoke execute on utl_smtp from public;
- SQL> revoke execute on utl_tcp from public;
- SQL> exit
2. Ensure the following user-ids' passwords, where applicable, have been changed:
- SYS
- SYSTEM
- DBSNMP
- OUTLN
- CTXSYS
- PERFSTAT
1. Adjust the database DEFAULT TABLESPACE settings so that the SYSTEM tablespace is not used inappropriately.
- sqlplus '/ as sysdba'
- SQL> alter database default tablespace users;
- SQL> alter user sys default tablespace system;
- SQL> alter user system default tablespace system;
2. Correct any users that already have SYSTEM as their DEFAULT TABLESPACE
- sqlplus '/ as sysdba'
- SQL> select username, default_tablespace from dba_users where default_tablespace = 'SYSTEM';
- SQL> alter user <user name> default tablespace <non-SYSTEM tablespace>;
- SQL> exit
3. Lock and expire potentially harmful built-in user-ids.
- sqlplus '/ as sysdba'
- SQL> alter user outln password expire account lock;
- SQL> alter user dbsnmp password expire account lock;
- SQL> exit
Regression
To restore the environment back to its initial state, perform the following
1. Shutdown the environment
2. Remove all database files, binaries, trace files and administration logs using the deinstall tool - see Deinstall Section below.
File Listings
oracle .profile
#----------------------------------------------------------------------
# Configure Terminal Settings.
#----------------------------------------------------------------------
stty susp ^Z
stty quit ^C
stty erase ^H
export TERM=vt100-w
export ORACLE_TERM=vt100#----------------------------------------------------------------------
# Configure Shell Settings.
#----------------------------------------------------------------------
set -o vi
export PATH=/bin:/usr/sbin:/usr/bin:/usr/local/bin:/usr/ccs/bin:$PATH
export EDITOR=vi
export HOSTNAME=‘hostname`
export PS1=’$LOGNAME@$HOSTNAME:$ORACLE_SID> '
export TMPDIR=/tmp
export TEMP=/tmp
umask 022#----------------------------------------------------------------------
# Configure Aliases.
#----------------------------------------------------------------------
alias ll="ls -la"
alias bdf="df -k"#----------------------------------------------------------------------
# Configure Oracle Settings.
#----------------------------------------------------------------------
export ORACLE_BASE=/u01/app/oracle
export SQLPATH=$ORACLE_BASE/scripts/sql
export ORACLE_HOME=$ORACLE_BASE/product/11.2.0/dbhome_1
export TNS_ADMIN=$ORACLE_HOME/network/admin
export ORACLE_HOME_LISTNER=$ORACLE_BASE/product/11.2.0/dbhome_1
export PATH=$ORACLE_HOME/bin:$PATH
export ORATAB=/etc/oratab
oratab
rac1
rac1:/u01/app/oracle/product/11.2.0/dbhome_1:Y
+ASM1:/u01/app/oracle/product/11.2.0/grid:N
rac2
rac2:/u01/app/oracle/product/11.2.0/dbhome_1:Y
+ASM2:/u01/app/oracle/product/11.2.0/grid:N
File Systems
--- /u01 --- /app --- /oraInventory
|aaaaaaaaaaaaaa|
|aaaaaaaaaaaaaa--- /oracle --- /software
|aaaaaaaaaaaaaaaaaaaaaaa|
|aaaaaaaaaaaaaaaaaaaaaaa--- /dba --- /scripts
|aaaaaaaaaaaaaaaaaaaaaaa|
|aaaaaaaaaaaaaaaaaaaaaaa|aaaaaaa--- /sql
|aaaaaaaaaaaaaaaaaaaaaaa|
|aaaaaaaaaaaaaaaaaaaaaaa--- /diag
|aaaaaaaaaaaaaaaaaaaaaaa|
|aaaaaaaaaaaaaaaaaaaaaaa--- /product ---/11.2.0 ---/dbhome_1
|aaaaaaaaaaaaaaaaaaaaaaa|
|aaaaaaaaaaaaaaaaaaaaaaa--- /product ---/11.2.0 ---/grid
|aaaaaaaaaaaaaaaaaaaaaaa|
|aaaaaaaaaaaaaaaaaaaaaaa--- /admin --- /SID --- /adump
|aaaaaaaaaaaaaaaaaaaaaaaaaaaaaaaaaaaaaaaa|
|aaaaaaaaaaaaaaaaaaaaaaaaaaaaaaaaaaaaaaaa--- /create
|aaaaaaaaaaaaaaaaaaaaaaaaaaaaaaaaaaaaaaaa|
|aaaaaaaaaaaaaaaaaaaaaaaaaaaaaaaaaaaaaaaa--- /exp
|aaaaaaaaaaaaaaaaaaaaaaaaaaaaaaaaaaaaaaaa|aa (link to /u09)
|aaaaaaaaaaaaaaaaaaaaaaaaaaaaaaaaaaaaaaaa|
|aaaaaaaaaaaaaaaaaaaaaaaaaaaaaaaaaaaaaaaa--- /parfile
|aaaaaaaaaaaaaaaaaaaaaaaaaaaaaaaaaaaaaaaa|
|aaaaaaaaaaaaaaaaaaaaaaaaaaaaaaaaaaaaaaaa--- /pfile
|aaaaaaaaaaaaaaaaaaaaaaaaaaaaaaaaaaaaaaaa|
|aaaaaaaaaaaaaaaaaaaaaaaaaaaaaaaaaaaaaaaa--- /scripts ---/base ---/rfc
|
|
|
--- /u09 --- /oradata --- /SID -------- /exp ------- /d1
Example GRID Infrastructure Install

- Select Install and Configure Grid Infrastructure for a Cluster
- Click Next

- Select Typical Installation
- Click Next

- Set SCAN Name to rac-scan
- Click Add

- Set Hostname to rac2.mydomain.com
- Set Virtual IP Name to rac2-vip.mydomain.com
- Click OK

- Click SSH Connectivity…
- Ensure OS Username is set to Oracle
- Enter a valid password
- Click Setup
- Once complete click Test
- Click Identify network interfaces…

- Ensure the public and private nics are set correctly
- Click OK
- Click Next

- Ensure Oracle Base is set to /u01/app/oracle
- Allow Software Location to default
- Set Cluster Registry Storage Type to Automatic Storage Management
- Enter a valid SYSASM Password
- Confirm the password.
- Ensure OSASM Group is set to DBA
- Click Next

- Ensure the Disk Group Name is set to DATA
- Set Redundancy to External
- Select Candidate radio button.
- Tick the disks you wish to add to the DATA disk group.
- Click Next

- Ensure the Inventory Directory is set to /u01/app/oraInventory
- Click Next

- Fix any prerequisite failures.
- Click Next

- Review the Summary screen
- Click Finish

- Monitor the install
- This screen will move on automatically when complete

- As root, run /u01/app/oraInventory/orainstRoot.sh on each node.
- As root, run /u01/app/11.2.0/grid/root.sh on each node.
- Click OK

- Monitor the Configuration Assistants.
- Fix and issues and retry if appropriate.
- Click Next

- Click Close
Example RAC Database Install

- Un-tick the I wish to receive security updates via My Oracle Support box.
- NB This is site specific and should be reviewed.
- Click Yes to remain uninformed.
- Click Next.

- Select Create and Configure a Database.
- Click Next.

- Ensure Server Class is selected.
- Click Next.

- Ensure Real Application Cluster database installation is selected.
- Click Select All
- Click Next.

- Select Typical Installation
- Click Next.

- Set Oracle Base to /u01/app/oracle
- Allow Software Location to default
- Set Storage Type to Automatic Storage Management
- Set Database file location to DATA
- Enter a valid password for ASMSNP Password
- Set Database edition to Enterprise Edition (4.29GB)
- Set OSDBA Group to dba
- Set Global database name to RAC.mydomain.com
- Enter a valid Administrative password
- Confirm the Password
- Click Next

- Fix any prerequisite failures.
- Click Next

- Review the summary.
- If required save the response file by selecting Save Response File
- Click Finish

- This screen moves on automatically when complete.

- When the install is finished, DBCA will start automatically. Complete the DBCA wizard and monitor its progress.

- Set-up the passwords by clicking on Password Management if required.
- Click OK.

- As root, run /u01/app/oracle/product/11.2.0/dbhome_1/root.sh on each node.
- Click OK

- Make a note of the Database Control url if configured.
- Click Close
Other References
- None Currently
Known Issues
Applications Requiring a 32bit Client
Description
Oracle 11g 64-bit installations no longer include the 32-bit libraries, therefore a seperate installation and patching process must be performed if you want access to 32bit libraries.
Fix
1. Download the 32bit client from OTN
- linux_11gR2_client.zip : 642,016,988 bytes; cksum - 1997033971
2. Configure the DISPLAY variable, if not already set.
3. Start X-server, if not already running.
4. Unset the ORACLE_SID, ORACLE_HOME and TNS_ADMIN
- unset ORACLE_SID
- unset ORACLE_HOME
- unset TNS_ADMIN
5. Start the installer.
- cd /u01/app/oracle/SOFTWARE/client
- ./runInstaller
6. Follow the instructions as demonstrated in the Example 32-bit Install section below.
7. Patch the 32-bit software home with any relevant CPU or PSU patches
See Metalink article 883702.1 for further details.
ORA-7445 [kokscold()+849]
Description
This is due to unpublished Bug 9594372, documented in Note 1115493.1 and occurs when running SQL_ANALYZE from a scheduled job. The SQL statement is likely to be similar to the following.
/* SQL Analyze(397,1) */ MERGE INTO MGMT_ARU_PATCH_RECOMMENDATIONS p USING ..
Fix
Apply patch 9594372
Running root.sh on the Database
Description
When running root.sh you are prompted for the local bin directory. The default directory is specified in square brackets. However, due to a bug in the root.sh script this default is not picked up. As a result, you will always need to specify the local bin directory regardless of the default specified within the square brackets.
Example Output
[root@myhost dbhome_1]# ./root.sh
Running Oracle 11g root.sh script…The following environment variables are set as:
ORACLE_OWNER= oracle
ORACLE_HOME= /u01/app/oracle/product/11.2.0/dbhome_1Enter the full pathname of the local bin directory: [/usr/local/bin]: /usr/local/bin
The file "dbhome" already exists in /usr/local/bin. Overwrite it? (y/n)
[n]: y
Copying dbhome to /usr/local/bin …
The file "oraenv" already exists in /usr/local/bin. Overwrite it? (y/n)
[n]: y
Copying oraenv to /usr/local/bin …
The file "coraenv" already exists in /usr/local/bin. Overwrite it? (y/n)
[n]: y
Copying coraenv to /usr/local/bin …
Entries will be added to the /etc/oratab file as needed by
Database Configuration Assistant when a database is created
Finished running generic part of root.sh script.
Now product-specific root actions will be performed.
Finished product-specific root actions.
SCAN Listener Check
The following details how to check that the SCAN listener resolves correctly.
- Running nslookup on the SCAN address rac-scan.mydomain.com should output the following
oracle> nslookup rac-scan.mydomain.com

Server:         192.168.2.10
Address:        192.168.2.10#53

Name:   rac-scan.mydomain.com
Address: 192.168.2.221
Name:   rac-scan.mydomain.com
Address: 192.168.2.222
Name:   rac-scan.mydomain.com
Address: 192.168.2.223
- Running a reverse lookup on 192.168.2.221 should output the following
oracle> nslookup 192.168.2.221

Server:         192.168.2.10
Address:        192.168.2.10#53

221.2.168.192.in-addr.arpa      name = rac-scan.mydomain.com.
- Running a reverse lookup on 192.168.2.222 should output the following
oracle>  nslookup 192.168.2.222

Server:         192.168.2.10
Address:        192.168.2.10#53

222.2.168.192.in-addr.arpa      name = rac-scan.mydomain.com
- Running a reverse lookup on 192.168.2.223 should output the following
oracle> nslookup 192.168.2.223

Server:         192.168.2.10
Address:        192.168.2.10#53

223.2.168.192.in-addr.arpa      name = rac-scan.mydomain.com
Deinstalling Oracle 11g Binaries and Database
With 11.2 the Oracle Universal Installer no longer removes Oracle software. Use the new deinstallation tool called deinstall available on the installation media before installation as well as in the Oracle home directory after installation.
Step-by-Step
1. Run this tool from ORACLE_HOME first.
- cd $ORACLE_HOME/deinstall
- ./deinstall
- When prompted for the database name enter the SID you want to remove.
- NB This will remove the database binaries too.
- When asked Do you still want to modify the details of SID database(s)? [n]: Answer N
- NB You would answer Y if you wanted to amend the database configuration.
- The tool should now complete okay after performing several tasks. See example output below.
NOTES
An error will occur if there are any missing deinstall files at which point the tool prompts you to download the standalone version available in the deinstall directory on the installation media
Example Output
The following output is example output for removing a standalone database and the related binaries.
moc.niamodym.tsohym|elcaro#moc.niamodym.tsohym|elcaro:> ./deinstall
Checking for required files and bootstrapping …
Please wait …
Location of logs /u01/app/oracle/oraInventory/logs/############ ORACLE DEINSTALL & DECONFIG TOOL START ############
######################## CHECK OPERATION START ########################
Install check configuration STARTChecking for existence of the Oracle home location /u01/app/oracle/SID/product/11.2.0
Oracle Home type selected for de-install is: SIDB
Oracle Base selected for de-install is: /u01/app/oracle
Checking for existence of central inventory location /u01/app/oracle/oraInventoryInstall check configuration END
Network Configuration check config START
Network de-configuration trace file location: /u01/app/oracle/oraInventory/logs/netdc_check627197374662265908.log
Network Configuration check config END
Database Check Configuration START
Database de-configuration trace file location: /u01/app/oracle/oraInventory/logs/databasedc_check6468731932053553666.log
Use comma as separator when specifying list of values as input
Specify the list of database names that are configured in this Oracle home [SID]: SID
###### For Database 'SID' ######
Single Instance Database
The diagnostic destination location of the database: /u01/app/oracle/SID/admin/SID/trace/diag/rdbms/SID
Storage type used by the Database: FS
Database file location: /u03/oradata/SID/users/d1,/u03/oradata/SID/tools/d1,/u03/oradata/SID/indx/d1,/u03/oradata/SID/system/d1,/u03/oradata/SID/sysaux/d1,/u04/oradata/SID/undo/d1
Flash recovery area location: /u10/oradata/SID/flash/d1/SID
database spfile location: /u01/app/oracle/SID/product/11.2.0/dbs/spfileSID.oraThe details of database(s) SID have been discovered automatically. Do you still want to modify the details of SID database(s)? [n]:
Database Check Configuration END
Enterprise Manager Configuration Assistant START
EMCA de-configuration trace file location: /u01/app/oracle/oraInventory/logs/emcadc_check.log
Checking configuration for database SID
Enterprise Manager Configuration Assistant END
Oracle Configuration Manager check START
OCM check log file location : /u01/app/oracle/oraInventory/logs//ocm_check3867.log
Oracle Configuration Manager check END######################### CHECK OPERATION END #########################
####################### CHECK OPERATION SUMMARY #######################
Oracle Home selected for de-install is: /u01/app/oracle/SID/product/11.2.0
Inventory Location where the Oracle home registered is: /u01/app/oracle/oraInventory
The following databases were selected for de-configuration : SID
Database unique name : SID
Storage used : FS
No Enterprise Manager configuration to be updated for any database(s)
No Enterprise Manager ASM targets to update
No Enterprise Manager listener targets to migrate
Checking the config status for CCR
Oracle Home exists with CCR directory, but CCR is not configured
CCR check is finished
Do you want to continue (y - yes, n - no)? [n]: y
A log of this session will be written to: '/u01/app/oracle/oraInventory/logs/deinstall_deconfig2009-11-03_10-45-31-AM.out'
Any error messages from this session will be written to: '/u01/app/oracle/oraInventory/logs/deinstall_deconfig2009-11-03_10-45-31-AM.err'######################## CLEAN OPERATION START ########################
Enterprise Manager Configuration Assistant START
EMCA de-configuration trace file location: /u01/app/oracle/oraInventory/logs/emcadc_clean.log
Updating Enterprise Manager ASM targets (if any)
Updating Enterprise Manager listener targets (if any)
Enterprise Manager Configuration Assistant END
Database de-configuration trace file location: /u01/app/oracle/oraInventory/logs/databasedc_clean6686076943326692780.log
Database Clean Configuration START SID
This operation may take few minutes.
Database Clean Configuration END SIDNetwork Configuration clean config START
Network de-configuration trace file location: /u01/app/oracle/oraInventory/logs/netdc_clean7861096860567065254.log
De-configuring Local Net Service Names configuration file…
Local Net Service Names configuration file de-configured successfully.De-configuring backup files…
Backup files de-configured successfully.The network configuration has been cleaned up successfully.
Network Configuration clean config END
Oracle Configuration Manager clean START
OCM clean log file location : /u01/app/oracle/oraInventory/logs//ocm_clean3867.log
Oracle Configuration Manager clean END
Oracle Universal Installer clean STARTDetach Oracle home '/u01/app/oracle/SID/product/11.2.0' from the central inventory on the local node : Done
Delete directory '/u01/app/oracle/SID/product/11.2.0' on the local node : Done
The Oracle Base directory '/u01/app/oracle' will not be removed on local node. The directory is in use by Oracle Home '/u01/app/oracle/agent10g'.
The Oracle Base directory '/u01/app/oracle' will not be removed on local node. The directory is in use by central inventory.
Oracle Universal Installer cleanup was successful.
Oracle Universal Installer clean END
Oracle install clean START
Clean install operation removing temporary directory '/tmp/install' on node 'myhost'
Oracle install clean END
######################### CLEAN OPERATION END #########################
####################### CLEAN OPERATION SUMMARY #######################
Successfully de-configured the following database instances : SID
Cleaning the config for CCR
As CCR is not configured, so skipping the cleaning of CCR configuration
CCR clean is finished
Successfully detached Oracle home '/u01/app/oracle/SID/product/11.2.0' from the central inventory on the local node.
Successfully deleted directory '/u01/app/oracle/SID/product/11.2.0' on the local node.
Oracle Universal Installer cleanup was successful.Oracle install successfully cleaned up the temporary directories.
#################################################################################### ORACLE DEINSTALL & DECONFIG TOOL END #############
Example 32bit Install
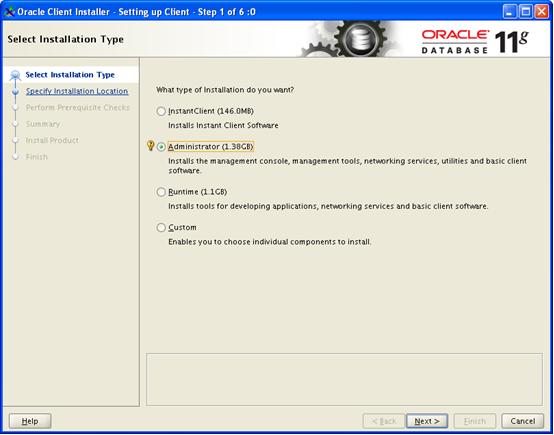
- Ensure Administrator is selected
- Click Next

* Ensure English & English (United Kingdom) languages are selected
* Click Next
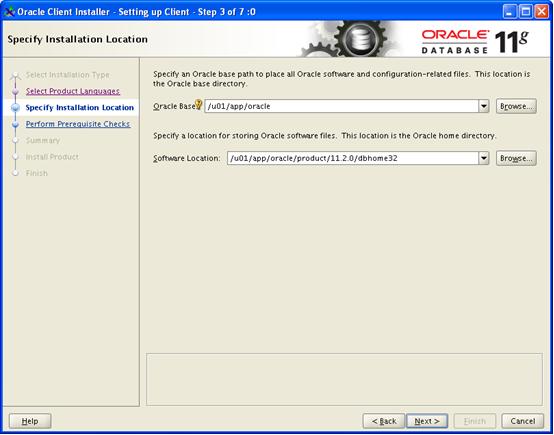
- Ensure Oracle Base is set to /u01/app/oracle
- Ensure Software Location is set to /u01/app/oracle/product/11.2.0/dbhome32
- Click Next

- Review the summary
- Click Finish

- Wait approx 5 mins for install to complete…

- As root, ask the UNIX administrator to run /u01/app/oracle/product/11.2.0/dbhome32/root.sh
- Enter /usr/local/bin
- Enter Y
- Enter Y
- Enter Y
- Click OK

- Click Close


